Genderbend Gaston
- Shadowklepto

- Dec 28, 2020
- 4 min read
Part of my 2020 Cosplans have me wanting to do Disney Villains. I'm going to start with my boy Gaston. Sydney Supanova is where I plan to debut him, I'll also need to take into consideration that it's the start of Winter in June so it's likely that it'll be cold.
Fun Fact: Gaston actually has a last name, it's LeGume. it was part of the plans from the original screenplay in which the story was quiet different. it plays off his supposed lack of intelligence and 'pea brain'.
As always gather reference images.


So there's already a fair few genderbend Gastons around when you do a google image search. the next step in my process is breaking down the part I'm going to need then working out what I need to Buy, Make or Modify. Also deciding on which prop.
Break it down:
Black Wig (Styled into a ponytail fastened with a red ribbon.
Yellow Gloves. (Can either used Satin costume gloves or Leather welder/gardening gloves.
Red Tunic with Yellow collar.
Belt with a large buckle.
Black leggings or tights.
Brown boots. mid calf length
(Optional) Blue Cloak with chain clasp.
Prop options:
Blunderbuss (Rifle)
Bow and Arrow (Longbow?)
5 Cartons of eggs (empty cartons)


Creation:

As with most girls I already own black tights so those relatively easy to source. I have a couple of Belt options in one that I already have and one that I found at a local Op Shop that has a decent chunky sized buckle. Will decide which looks better once the tunic part is sorted.
The Tunic Dress:

Purchased material from Spotlight 4 meters of a cotton type material in Rouge, 1 meter of the same type of Material in Canary. I already have some stiff interfacing for the collar left over from when I made my Nightwing and Riddler cosplays.
I also picked up some Eyelets and brown ribbon as I was toying with the idea of having a lace up front rather then leave it open. Haven't worked with eye lets before so it's a new skill I'll be adding to my arsenal.
I'm planning to use the same pattern as my Nightwing and Riddler as it has a similar shape. But I'm unsure about what to do when I hit the zipper place but we'll see what happens when I get there.
After cutting out the pieces and sewing them together without the collar I had a decent base dress. An issue I ran into and I find I often keep running into is that I made the waist slightly to small. So while the dress does fit it's a bit tricky to get over the chest region. I also get into a bit of a role and totally forgot to sew in the pockets I'd planned to add. So I will likely look into getting some belt pouches.


I cut out a template for the collar from the Batwoman pattern but modified it some so that it was more of a straight and angular collar rather then the notched one that the pattern has. I'm still not totally happy with it's size so I may revisit and modify it later.
As for the Eyelets. I have a paper hole punch that was about the right size of the eyelets that I had. Testing first on some scrap material to make sure that it's work and I'd have the eyelet gun the right way up I did around 4 test punches before I went and did the collar.
With the dress on and using just a ruler I measured where about I wanted the eyelets to go. There's about 1.5inch space between each. A total of 6 eyelets, 3 either side.
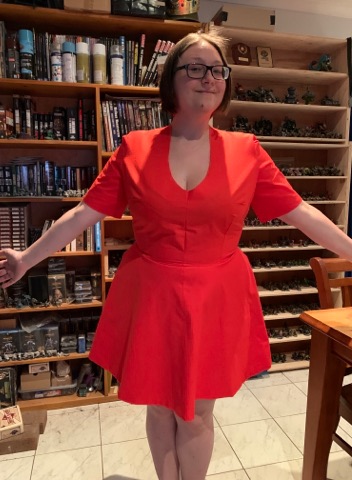
Threaded the ribbon through and made sure to have enough excess that it wouldn't un-thread itself if worn undone. (as pictured). All in all not mad at how it came out but there's a few mistakes that could be improved on.
I'm still not totally happy with the neckline so I'll need more practice with attaching collars to garments.
The Wig
Started with a cheap dollar store wig. Used a toilet paper roll to curl up the fringe into a more pin up style roll. Then went in with an insane amount of the Got2b Glued hair spray. Used a hair dryer on low to help set it. Pulled out the toilet roll and then pinned it in place with large bobby pins. Gave it another blast of hair spray and tamed the fly away bit with a toothbrush (it's one I have dedicated to helping with wigs). In once more with the hair dryer just to be sure it was set and I was ready to do the pony. Basically bunched it into a loose pony so that it covered the cap and left little to droop over my hairline when the wig was on. Tied a piece of red ribbon in a neat bow partway down the ponytail. Then gave the whole thing a going over with hairspray to ensure that nothing moved.
(Excuse the face I painted on Vanessa)


Now the Accessories:
After trying the dress on and finding some yellow gloves at a party store (they're a big misshapen for my hands) and deciding on the Smaller of the two belts I set about collecting my egg cartons. I needed 5 of the dozen eggs. Luckily my brother-in-law was getting married and my mother-in-law was baking a whole mess of biscuits so I got three of my five from her the remaining two I bought myself. Here's what we have so far:

Last step was to buy my boots. I'd been eyeing off a pair on e-bay but I'm always a little cautious bout buying shoes online as my feet aren't always cooperative. Then of course make up. Which I'm no expert at. I have learnt a few small tricks along the way namely to use an eyebrow template and always wear lashes because it's a very different look if you don't.


Comments